Create Tables
Space and Time Managed DB allows for many different choices when creating tables, to provide great flexibility on how best to satisfy your use-case. This guide will outline the type of tables available, which work together, the variety of ways in which they are secured, and some example use-cases.
For reference, a simple example of a table in Space and Time Managed DB may look like:
CREATE TABLE SXTTEMP.EXAMPLE_TABLE_000123
( MyData_ID    INTEGER
, MyData_Name  VARCHAR
, MyData_Date  DATE
, MyData_TS.   TIMESTAMP
, PRIMARY KEY (MyData_ID)
)
WITH "public_key=$RESOURCE_PUBLIC_KEY"
There are four ways to assign options / permissions to Tables in the Space and Time Managed DB:
- Table Creation Settings - permissions or options granted directly to the table during table creation, and are applicable to everyone on the network, regardless of any other option types
- Authentication (Ledger Tables) - permissions or options granted by nature of your UserID or Subscription
- Authorization - permissions or options granted by biscuits (decentralized authorization via a self-custoded bearer token that the owner of the table can create and share)
Table Options: TABLE CREATION SETTINGS
Tables in Space and Time Managed DB can be set with default permissions at table create time, that are granted to everyone on the network by default - regardless of other permission types. Because these permissions are so widely applied, it's important to understand and set appropriately to your use-case.
TABLE CREATION SETTING:
Access type defines the global default access type for the table or view. For example, you can make the table globally public or private. To set the default table permission, you add the property access_type= to the WITH statement during table creation. If omitted, Space and Time Managed DB will default to "Permissioned" (aka Private) which is the most restrictive default permission.
-
PERMISSIONED (default setting) - No access is provided by default, and every request must include a biscuit authorization. If not set, your table will default to a Permissioned table.
- Syntax: modify your
WITHstatement to:
WITH "public_key=$RESOURCE_PUBLIC_KEY, access_type=PERMISSIONED"(or omitaccess_type) - Use-Cases: private or internal organizational data, such as CRM data, private application logs, organizational master data, user analytics, etc.
- Syntax: modify your
-
PUBLIC_READ - Everyone on the network will have
SELECTaccess by default, allowing anyone on the network to run queries on the data. For example, all Space and Time (SXT Chain) Blockchain tables are PUBLIC_READ.- Syntax: modify your
WITHstatement to:
WITH "public_key=$RESOURCE_PUBLIC_KEY, access_type=PUBLIC_READ" - Use-Cases: publicly accessible data like weather data, stock or blockchain data, social feeds, test data, or anonymized data for educational or hackathon purposes.
- Syntax: modify your
-
PUBLIC_APPEND - Everyone on the network will have
SELECT,INSERTpermissions by default, allowing anyone on the network to query OR insert new data. Only users with the appropriate biscuit authorization can update or delete data, or modify the table's structure. This is sometimes used as a public (append-only) logging mechanism, although it's important to note that anyone on the network can add any number of new records.- Syntax: modify your
WITHstatement to:
WITH "public_key=$RESOURCE_PUBLIC_KEY, access_type=PUBLIC_APPEND" - Use-Cases: Rare, but some publicly accessible logs or anonymized data collection points.
- Syntax: modify your
-
PUBLIC_WRITE - Everyone on the network will have
SELECT,INSERT,UPDATE,DELETEpermissions by default, allowing anyone on the network to query, add, delete, or alter any data in the table. Only users with the appropriate biscuit authorization can modify the table or view's structure. This is often used by MakeInfinite in demo projects, as it allows easy and open access to try Space and Time Managed DB features, without needing to worry about biscuits. Because literally anyone can do anything to the data, this is not typically used outside of demos.- Syntax: modify your
WITHstatement to:
WITH "public_key=$RESOURCE_PUBLIC_KEY, access_type=PUBLIC_WRITE" - Use-Cases: Publically accessible temporary data caches (insert / process / delete), or test-dev tables , or for simplified demos of data processes (where data quality doesn't matter)
- Syntax: modify your
TABLE CREATION SETTING: Mutable vs Immutable
Space and Time Managed DB allows users to make tables either Mutable or Immutable:
-
Mutable tables (default table setting) are regular SQL tables and support the full range of data types and SQL operations.
-
Immutable tables can be selected and inserted into, however deletes and updates are disallowed. This is good for historic or log tables where the data will never change. In addition, immutable tables can take advantage of several high-performance optimizations that make them more performant than mutable tables.
Syntax: modify your
WITHstatement to:
WITH "public_key=$RESOURCE_PUBLIC_KEY, access_type=PUBLIC_WRITE, immutable=true"
Take great care when creating Immutable tables - they cannot be dropped or modified!
TABLE CREATION SETTING: Permissioned Views
While not technically a table, permissioned views provide alternative and limited access to a table without exposing the underlying table itself, by using a view. Essentially it allows a view's permission to emulate that of a table.
For example, imagine an Employee table, and you want to provide views for each department. You can do this with a normal view, however, employees will also have access to all underlying tables (whether they understand that or not). A permissioned view could be created for each department, with WHERE statements that constrain the returned data to only one department. You could then issue biscuits to each user or department that allow them to access the Permissioned view, but with NO ACCESS to the underlying table.
The user would still need to use biscuits to authorize, however that authorization is only for the table, not any underlying tables. This is a way to setup "row level security" for a group of employees.
Table Options: AUTHENTICATION (Ledger Tables)
Some table behavior can change depending on who is logged in, and what that particular user is trying to do. For example, you can configure tables that allows anyone to insert new rows, but each user can only select out their rows.
Ledger tables are multi-tenant tables that are similar to a blockchain ledger, where any permissionless authenticated user can insert rows of data, but the ledger tables' read authorization can be configured.
Ledger tables are designed to allow anyone to add new items to the table, however, each user can only select out rows that they themselves have inserted. Alternatively, you can allow limit selects to the entire subscription, allowing one organization to share a set of rows of a larger ledger.
Ledger tables are in pre-release right now - check back soon for full details!
Table Options: AUTHORIZATION (Biscuits)
These are options and / or permissions that are controlled by the decentralized authorization (biscuits).
Biscuits are a cryptographically secure decentralized authorization key that allows the holder of a table's private key to define and distribute authorizations to anyone, in a way that is both safe and organizationally manageable.
How Biscuits Work
Biscuits are created locally (client) using the Private Key of the database object (table or view), which is then verified on the network (server) with the object's Public key.
The process of creating a biscuit looks like:
- Create an ED25519 public/private keypair
- Create the desired object, with the Public key from #1 added to the
WITHstatement (required) - Submit the final
CREATE...statement to Space and Time Managed DB to be created, again including the Public key. - With the same Private key from #1, create a biscuit with the appropriate constraints and authorizations.
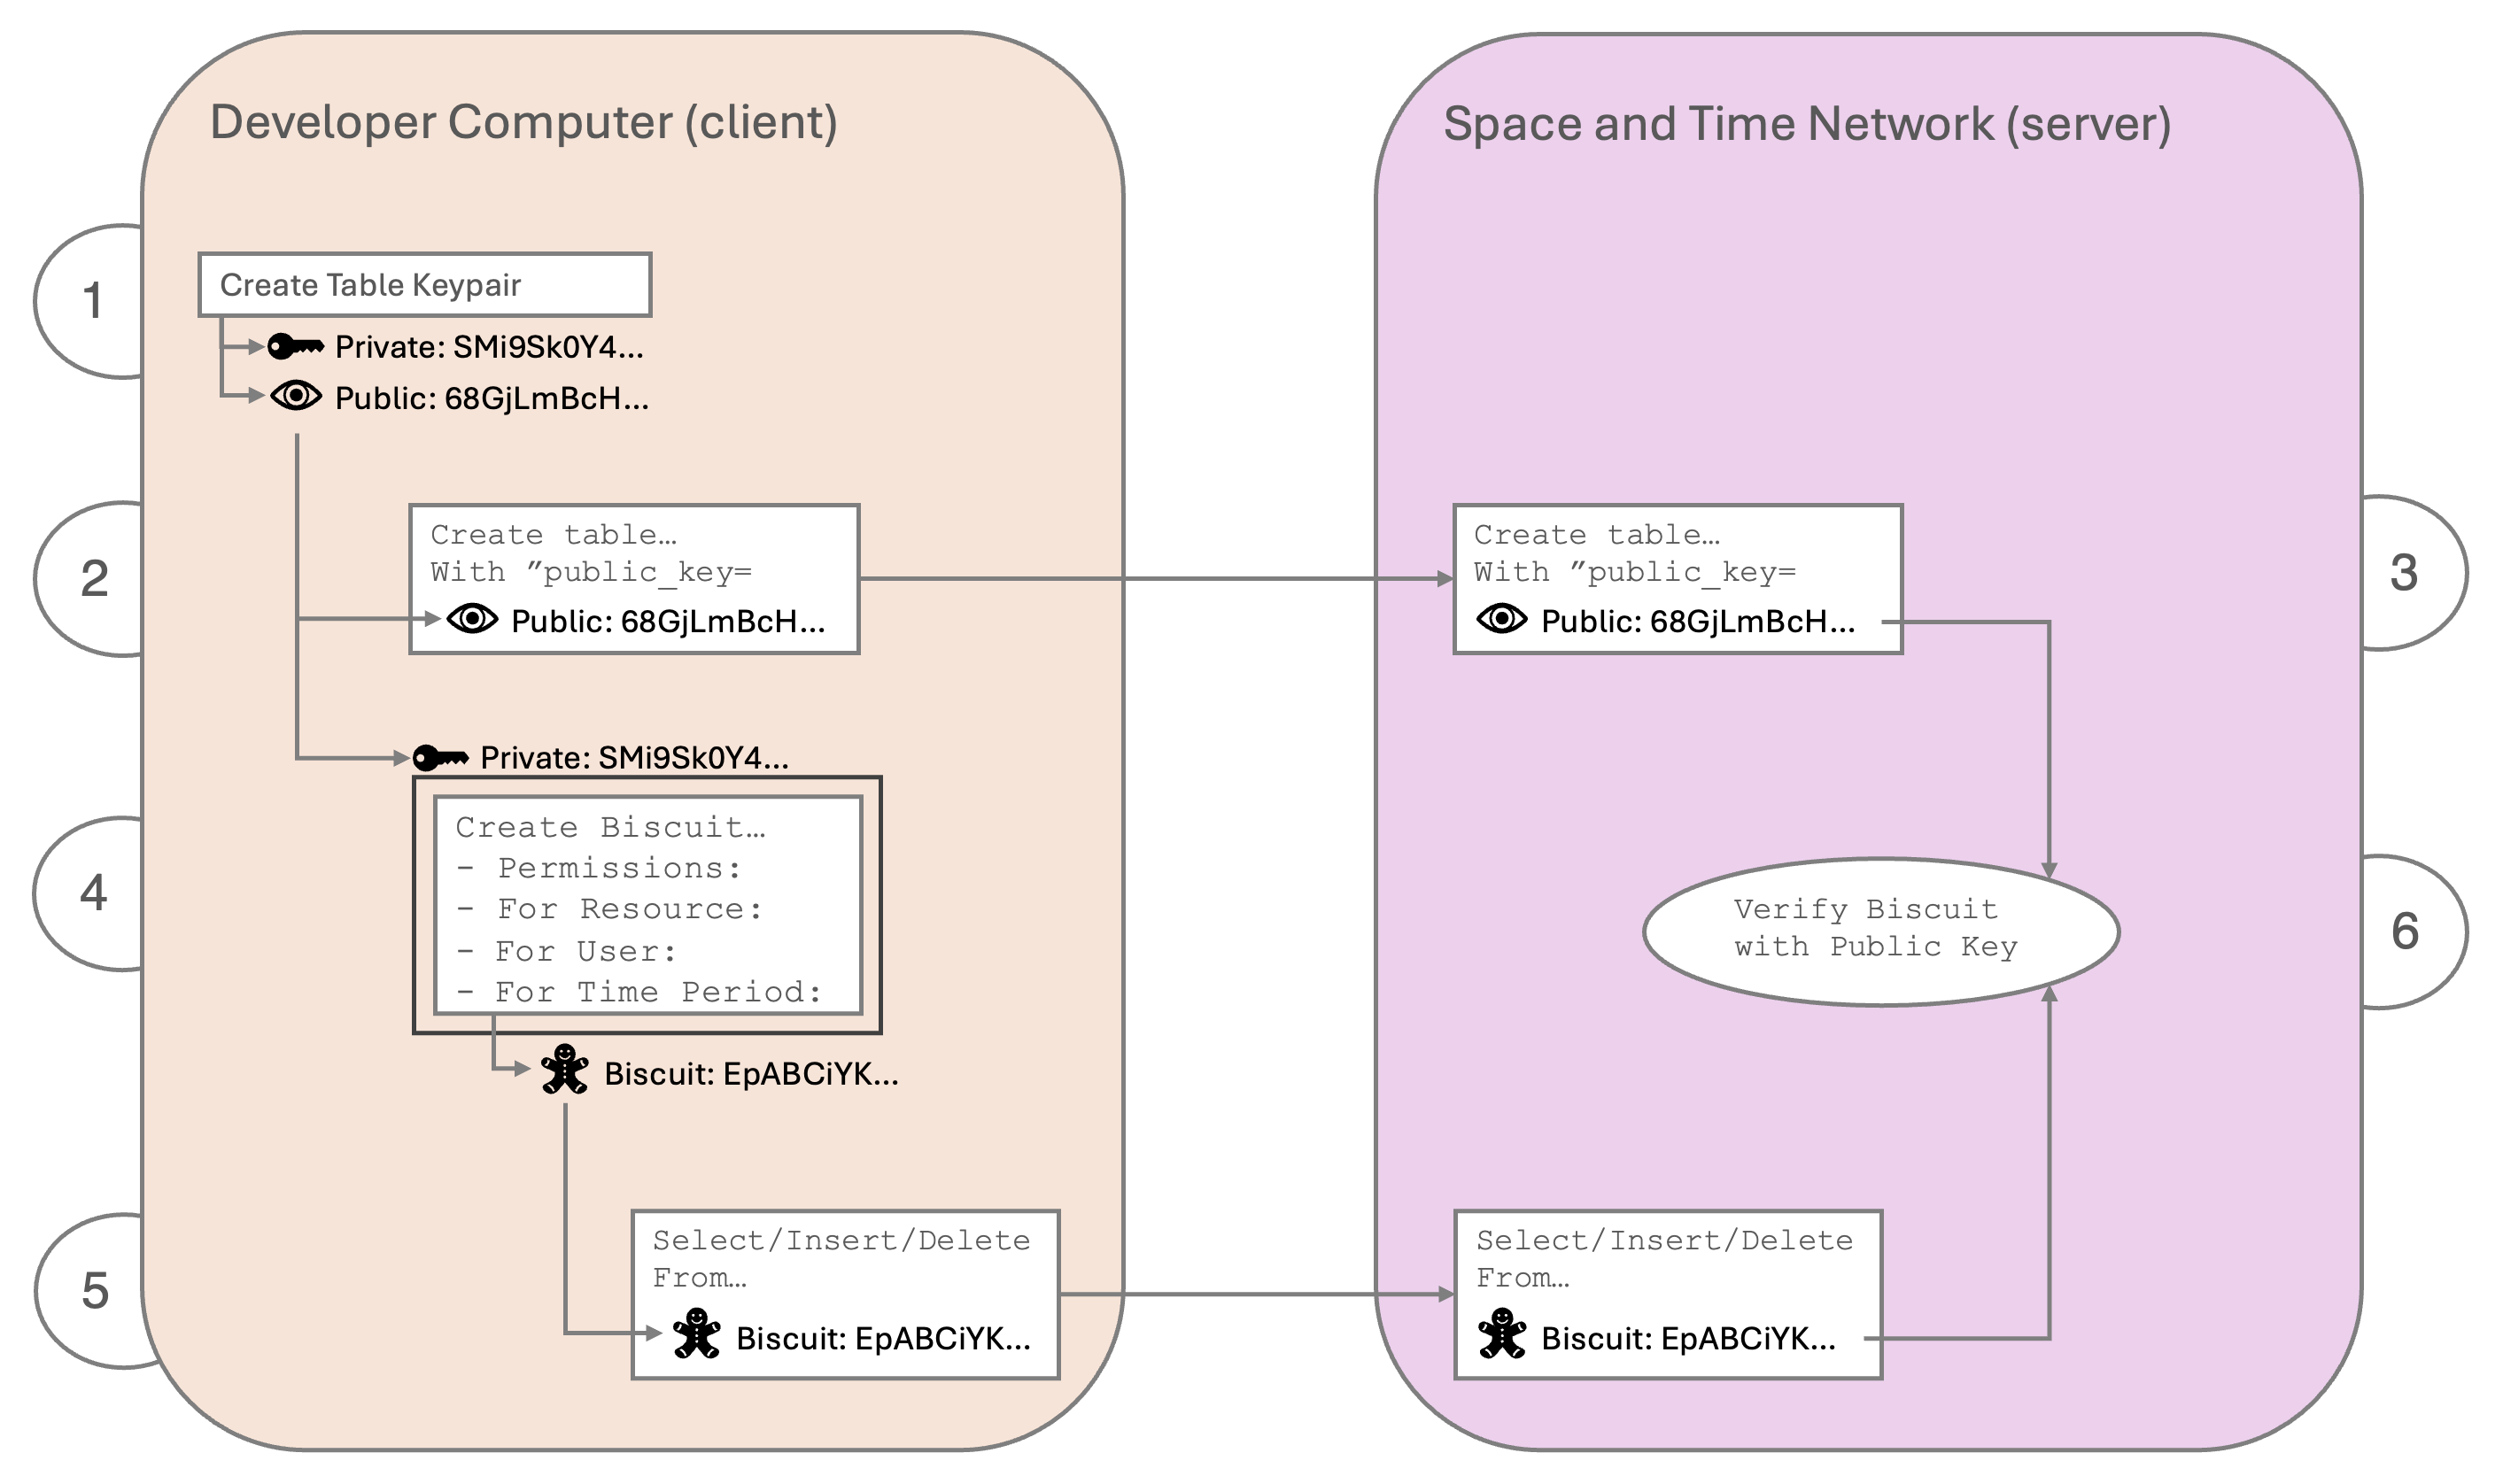
- The user submits a query to the network, and includes a biscuit.
- The table or view verifies the biscuit instructions, filters and capabilities using it's Public key, which must match the corresponding Private key from step #4
The ED25519 keypair created for tables and views are encoded in HEX, whereas the ED25519 keypair created for Users are encoded as BASE64. This is done to reinforce the fact that table keypairs and user keypairs are different. Also, HEX is SQL-Safe (needed to embed in CREATE statement), whereas Base64 is not.
How to Define a Biscuit?
To create a biscuit, you need a "datalog" - text that defines the authorization granted and to whom, in terms of filter "checks" and "capabilities." This datalog text is then signed by the private key that matches the table's public key.
Datalog entries come in two flavors: Capabilities and Checks (filters).
Capabilities
Capabilities are always structured as:sxt:capability("<operation>", "<resource>");
Operations are: dql_select, dml_insert, dml_update, dml_delete, ddl_create, ddl_drop
Resources are objects in the Space and Time Managed DB, most commonly Tables and Views. It is also possible to use the wildcard character * to represent ALL capabilities and/or resources (as long as the resource's public key matches).
A few examples:
sxt:capability("dql_select", "mySchema.myTable");
sxt:capability("dml_insert", "mySchema.myTable");
sxt:capability("dml_update", "mySchema.myTable");
sxt:capability("dml_delete", "mySchema.myTable");
sxt:capability("*", "mySchema.myTable");
sxt:capability("dql_select", "*");
sxt:capability("*", "*");
"Wildcard" biscuits are fine for development, but should rarely (if ever) be used in production.
Checks
Checks are structured like IF statements, and allow standard operations like equality, inequality, greater than, less than, etc. Currently you can write checks on:
- Timestamp
- UserID logged in
- Subscription associated with the UserID
A few examples:
check if sxt:user("Alice");
check if sxt:subscription("abc123_example_subscription");
check if time($time), $time <= 2024-07-01T12:00:00Z;
Filtering by your organization's subscription is a common way to protect your data using biscuits - even if the biscuit is leaked, biscuit checks cannot be changed - a subscription check only allowing User_IDs belonging to your subscription makes the biscuit useless to everyone else. Check out this page on finding your subscription.
Each line is evaluated alone, meaning they behave like AND operations. If you would like an OR operation (i.e., UserABC OR Subscription123) add them together on one line:
check if sxt:user("Alice") or sxt:subscription("abc123_example_subscription");
check if time($time), $time <= 2024-07-01T13:00:00Z or $time >= 2024-07-01T12:00:00Z;Time format must be ISO8601 compliant, as seen above.
A full combined biscuit might look something like:
sxt:capability("dql_select", "mySchema.myTable");
sxt:capability("dml_insert", "mySchema.myTable");
check if sxt:user("Alice") or sxt:subscription("abc123_example_subscription");
check if time($time), $time <= 2025-07-01T12:00:00Z;
Once you have the datalog (text above) and table's private key, you can put them together into a biscuit!
The SXT CLI does much of this work for you, and is a far easier approach. To see biscuit creation in action, check out this recipe!
How to Create a Biscuit with the CLI?
The easiest way to create new biscuits is to use the SXT CLI. You can create a biscuit for a resource (table or view) before or after creating the resource - it doesn't matter. You only need the private key and one capability to create a biscuit.
Confirm prerequisites: SXTCLI 0.0.6 or higher is installed and working, and you have loaded your table's public and private keys into environment variables RESOURCE_PUBLIC_KEY and RESOURCE_PRIVATE_KEY.
To test:
# display character length of private key, and full public key:
Demo~$ echo -n $RESOURCE_PRIVATE_KEY | wc -m
      64

Demo~$ echo $RESOURCE_PUBLIC_KEY
5CA5D53A2F58227676063C8187CEB171962B86909CF59205CBDCEEE98E2BDB69


# display version of sxtcli, and help menu:
Demo~$ sxtcli version
Version: 0.0.6


Demo~$ sxtcli help
Usage: <main class> [COMMAND]
Commands:
  help          Display help information about the specified command.
  authenticate  Perform platform authentication commands.
  biscuit       Perform biscuit commands.
  discover      Perform resource discovery commands.
  sql           Perform SQL commands.
  sql-support   Perform supporting SQL commands.
  subscription  Perform subscription commands.
  activity      Perform activity retrieval commands.
  version       Displays the version information
Build the biscuit: for the example biscuit below, we'll assume:
- the table:
mySchema.myTable - granting:
selectandinsertpermissions only - restricted only to: UserID
Alicein the SubscriptionIDabc123456789def - expiring end of year, 2024
This set of criteria would look like:
sxtcli biscuit generate table \
  --privateKey=$RESOURCE_PRIVATE_KEY \
  --resources="mySchema.myTable" \
  --operations=SELECT,INSERT \
  --users="Alice" \
  --subscriptions="abc123456789def" \
  --expires="2024-12-31T23:59:59Z"
The above SXTCLI command will create the biscuit, and print the full list of capabilities and checks, as well as the biscuit key at the bottom. Given the above sample input, the expected output would be:
Biscuit content:
 Facts:
  sxt:capability("dml_insert","myschema.mytable");
  sxt:capability("dql_select","myschema.mytable");
 Checks:
  check if sxt:user("Alice");
  check if sxt:subscription("abc123456789def");
  check if time($time), $time <= "2024-12-31T23:59:59Z";
Biscuit:
EtwCCvEBCg5zeHQ...
To confirm that the biscuit key contains the correct information, you can visit BiscuitSec.org and paste the above Biscuit key into the "Encoded token" textbox on the main page, and it will display the contents:

It is possible to create one biscuit that is good for many tables, but requires all tables be created with the same public key, so they can all be verify by the biscuit created with the same private key.
Best Practices for Biscuits
- Treat biscuits like the sensitive keys they are! Do not let them get out into the wild, there is no way to revoke, except to recreate your table with a brand new keypair.
- Always add a
check if sxt:subscription("<Your_Subcription>");so that the biscuit will only work if the user belongs to your SXT subscription.- Allows admins to quickly remove biscuit access by removing the UserID from the SXT subscription. Thus, biscuits will self-adjust for new hires and terminations.
- It also reduces risk if the biscuit is accidently lost / picked up by a malicious actor - it will only work for them if they are ALSO in your SXT organization.
- Force key rotation by setting expiration dates on all biscuits.
- It is also possible to create ephemerial biscuits - i.e., if you have an automated process that has access to the table's private key, it can create a biscuit with an expiration that aligns with the ACCESS_TOKEN timeout, and only for the current expected operations. i.e., unlike the private key, biscuits can be created JIT and need not be persistent.